Wednesday, February 27, 2013

You've got Great Genetics, don't be green with envy for anybody else's!

This blog post is not really about my green nails!  It's about genetics.

For the longest of time I truly, truly, believed that I was genetically predisposed to be "chubby", "fat", or at least NOT skinny.  Everybody in my entire family was skinny but me. (or it seemed that way, anyway).  I further justified my genetic destiny by rationalizing the fact that I had only 1/2 sisters, same mother, different father, so it MUST have been MY father's side that made me this way.  I believed this to be true until that magical year my life changed and I experienced a physical transformation completely unexpected....41 whole years!  In fact I don't believe I could have made it happen if I wanted to.  Of course I couldn't!  Because most of my life I thought I wanted to make it happen and it never did...it must be those damn genetics, right?

All of my adult life I worked as a professional manicurist, 27 years!  I never planned on this profession, it just kind of happened, kind of ironic because as a young girl / teenager I bit my fingernails down to the quick, and I always dreamed of having long beautiful feminine fingernails, like my sister Christy (the skinny one!) and all of my girlfriends (all skinny too of course).  But I didn't have beautiful nails like my sister because I had bad genetics!  Although I did break the habit of biting my nails when I was 14 years old, completely overnight, cold turkey, I still didn't have the long luxurious fingernails that were so in style of the day.  How does this have anything to do with weight loss?  I'm getting to it!

These days I literally have to file my nails down every 5-7 days!  They grow like weeds and since I prefer them really short, file away I do!  (kettlebell transfer swings and long nails do not like each other!)  Since I've retired from being a Manicurist I have plenty of time to take care of my own nails and, lucky me, I have the experience to do a really nice job of it!  What happened to my "bad fingernail genetics"?

Well, what happened to my fingernail health transformation was that I learned how to take care of them!  I learned what I had to do to have long, strong and healthy fingernails, (if I want to) despite what I thought my genetics predisposed me to.  At least that's what I believe to be true.  What else could explain it?

Do my fingernails have the same shape as my sisters?  No.  And I'm totally okay with that!  Do my thighs have the same shape as my sisters?  No.  And I'm totally okay with that.  What makes it all okay is that I am the best I can be, and that's pretty darn good!

Looking back at my history of being a fat kid (sorry, I mean "overweight" child) I can now remember that I was the kid sitting next to the chips and onion dip at every family get together.  I was the kid that volunteered to hand out school lunches in order to have access to the leftovers.  I was the kid that trekked carts full of glass bottles back to 7 - Eleven for the deposit, so I could spend ALL of the return money on Three Musketeers candy bars (at $.10 a piece, and that was a lot of candy!).  I was the kid that, for whatever reason, found some kind of comfort in eating more food than my body needed to be of a "normal" size.  It was not my genetics.

I now know without a doubt that this is the truth.

You have the best genetics!  Look at you!  Really, would you want to be someone else?  Be honest, other people bug you, right?  A little bit of care, maintenance and consistency go a long way!  Don't be envious of what you think other people have.  You have what you need and no one else can stop you from being your best.

Be your best.  It's never too late.  You can do it!


Tuesday, February 26, 2013

What a Day!

What a day!  Here is a short interview I did with Mari Fernandez part owner/operator of Full Force Personal Training in Modesto CA, after we completed video taping of not only Top 40, and Dirty 30 ("D30"), but I decided at the last minute to include a joint mobility warm up AND another 300 swing rep, 15 minute OTM workout ("on the minute").


Seems like so long ago, but it was just this past November.  I learned a lot of things that day!  I learned that 3000 swings is not 2000 swings!  The last video taping of "Give andTake" and "Roundabout 2.0" was just over 2000, but this was a whole 'nother animal!  Not sure if I would do it again....of course I'l do it again!  Who am I trying to kid?  It was fun as hell!

Swing workouts and routines just keep pouring out of me faster than I can record them!  If you have ordered Top 40 and have done at least the very first workout then, as promised, I have a special treat for you (and everybody else).  I'll be posting a free companion workout this weekend.  It will be much easier to train if you already are familiar with the theme and rhythm of Top 40.  If you haven't trained along to "Top 40", then maybe you'll want the other 3 workouts in the DVD!

Top 40 should be available for download this next week, and fingers crossed Dirty 30 ("D30") will be finished shortly!


Monday, February 25, 2013

Times Have Changed, and Times Are A Changin'. It's Time!

I am really proud to say that Mark and I have posted on our blog/blogs consistently for many, many, many years.  Mark started the first ever kettlebell training blog in May 2004, and I followed suit in Nov. 2006.   And if any of you know how the blogosphere works, blogs come and go...mostly go, because they are a damn lot of work to keep up.  Especially if you don't get paid through selling product or being sponsored (like moi).

Lots and lots of stuff has changed in this time period, including the addition of videos, then "talking" videos!  For me, even the titles of my blogs have changed based on what my life was experiencing at the time.  The original title to my first blog was "Rediscovering Strength", and here is the very first blog post I wrote in Nov, 2006, titled, "First Post", lol!


First Post

My name is Tracy Reifkind and over the last year I have maintained a weight loss of over 115 pounds. I'm 43 years old, 130 pounds and 20% bodyfat, size 6. This is about my kettlebell workouts, my food, and how alone, in my garage in just three short workouts a week I have gotten a body I never thought I would have.

I hope to help motivate and inspire those who are struggling to get started a lean ,strong and healthy lifestyle.

The story of the start of this journey can be read here on our website GiryaStrength:

http://giryastrength.com/pdf/Vitalics.pdf

I look forward to sharing my continuing journey as well as hearing from others who are on the same road.

http://tracyrif.blogspot.com/2006/11/first-post.html

It was my original intention to inspire and educate other people, through blogging, that have had, or that were having, similar experiences to mine, in regards mostly, to weight loss.  It was my intent to reach out to others that have felt like "the fat kid on the sidelines", or "the last kid picked for the team".  I clearly remember feeling like I was waiting for a chance for someone to recognize the drive I had in my heart and the physical talent that lay underneath a body that never really felt like it reflected who I was inside, or what I knew I was capable of.  "Rediscovering Strength" was during a time when I was living my "second chance", and what a second chance it was!

"Living My Physical Potential" was born from the "rediscovery of my strength"!  "Living My Physical Potential" was about consistency.  The consistency of showing up, no matter how I felt, to do what I knew was the key to freedom, physical freedom.  "Strength" to me means many things.  Strength means doing what is right before doing what feels comfortable.  Comfort comes in the rewards of strength.  I was living strength to the best of my ability and drive...I was living my physical potential.

Parallel Universe

I started my second blog in May 2008 titled, "Food and Thought".  This is where you are now.  It overlapped my first blog "LMPP".  I started this blog without any mention of training, or exercise.  I wanted this blog to be separate from my training blog, and only wanted to focus on my love for home cooking, food and eating.  The making and preparation of foods, the concept of healthy eating, diet and feeding yourself, but mostly, mostly, I wanted to provide a safe place for people that thought they had weight "issues", "problems", and "struggles" to share openly the message of hope outside of the kettlebell community.  I never, ever, once announced or promoted this blog.  You all have found me on your own.

"Exercise people" do not understand what it's like to gain 100 lbs + (give or take 20, 50, another 100 lbs).  Exercise people can help you lose it, for sure, but they lack the understanding of the psychology of letting yourself gain so much extra bodyweight.  I wanted to create a blog that was safe for us to talk and write about being fat, getting fat, staying fat, losing fat, not wanting to be fat, outside of the sometimes judgmental eyes of "the fit".  So I kept it on the "down low", knowing if anybody wanted to find it, they would.

For nine months starting in Nov 2008 Mark and I both decided to step back from the kettlebell blogosphere to take care of our personal lives, but I continued my "secret" blog, "Food and Thought".  After a couple months kettle bell training started creeping into this blog!  What was I supposed to do?  Training was part of who I was, and without the other outlet of "LMPP" I started posting videos and workouts.  So I changed the title of this blog to "Training" Food and Thought.

"Training" in the title means a few things.  It means "training kettle bells" (and yoga, and any other physical exercise I find myself doing).  "Training Food" as in the practice of preparing your own homemade meals and foods.  And "Training Thought", as in looking at how you think about your life's situation, taking control, or at least becoming aware of what is getting in the way of your dreams.  (if you haven't figured it our yet, YOU are the one getting in the way!)

So here I am now.  Today.  The Queen of the Kettlebell Swing, and an author of a book on exercise/fitness and diet published by Harper One....and still posting my measly blog with about 200-300 hits a day.  No paid sponsors, and practically one or two comments every now and then.  But still I'm on the verge yet another transformation, another blog title change!

What will it be?

Funny how much things have changed, but yet nothing has changed.  I am the same person I always was on the inside, only now reflected on the outside.  And the fun is starting again!  So much seriousness, in fact too much seriousness this past year!  It's my time for the best adventures of all, and I know you are feeling it too!

Stay tuned!

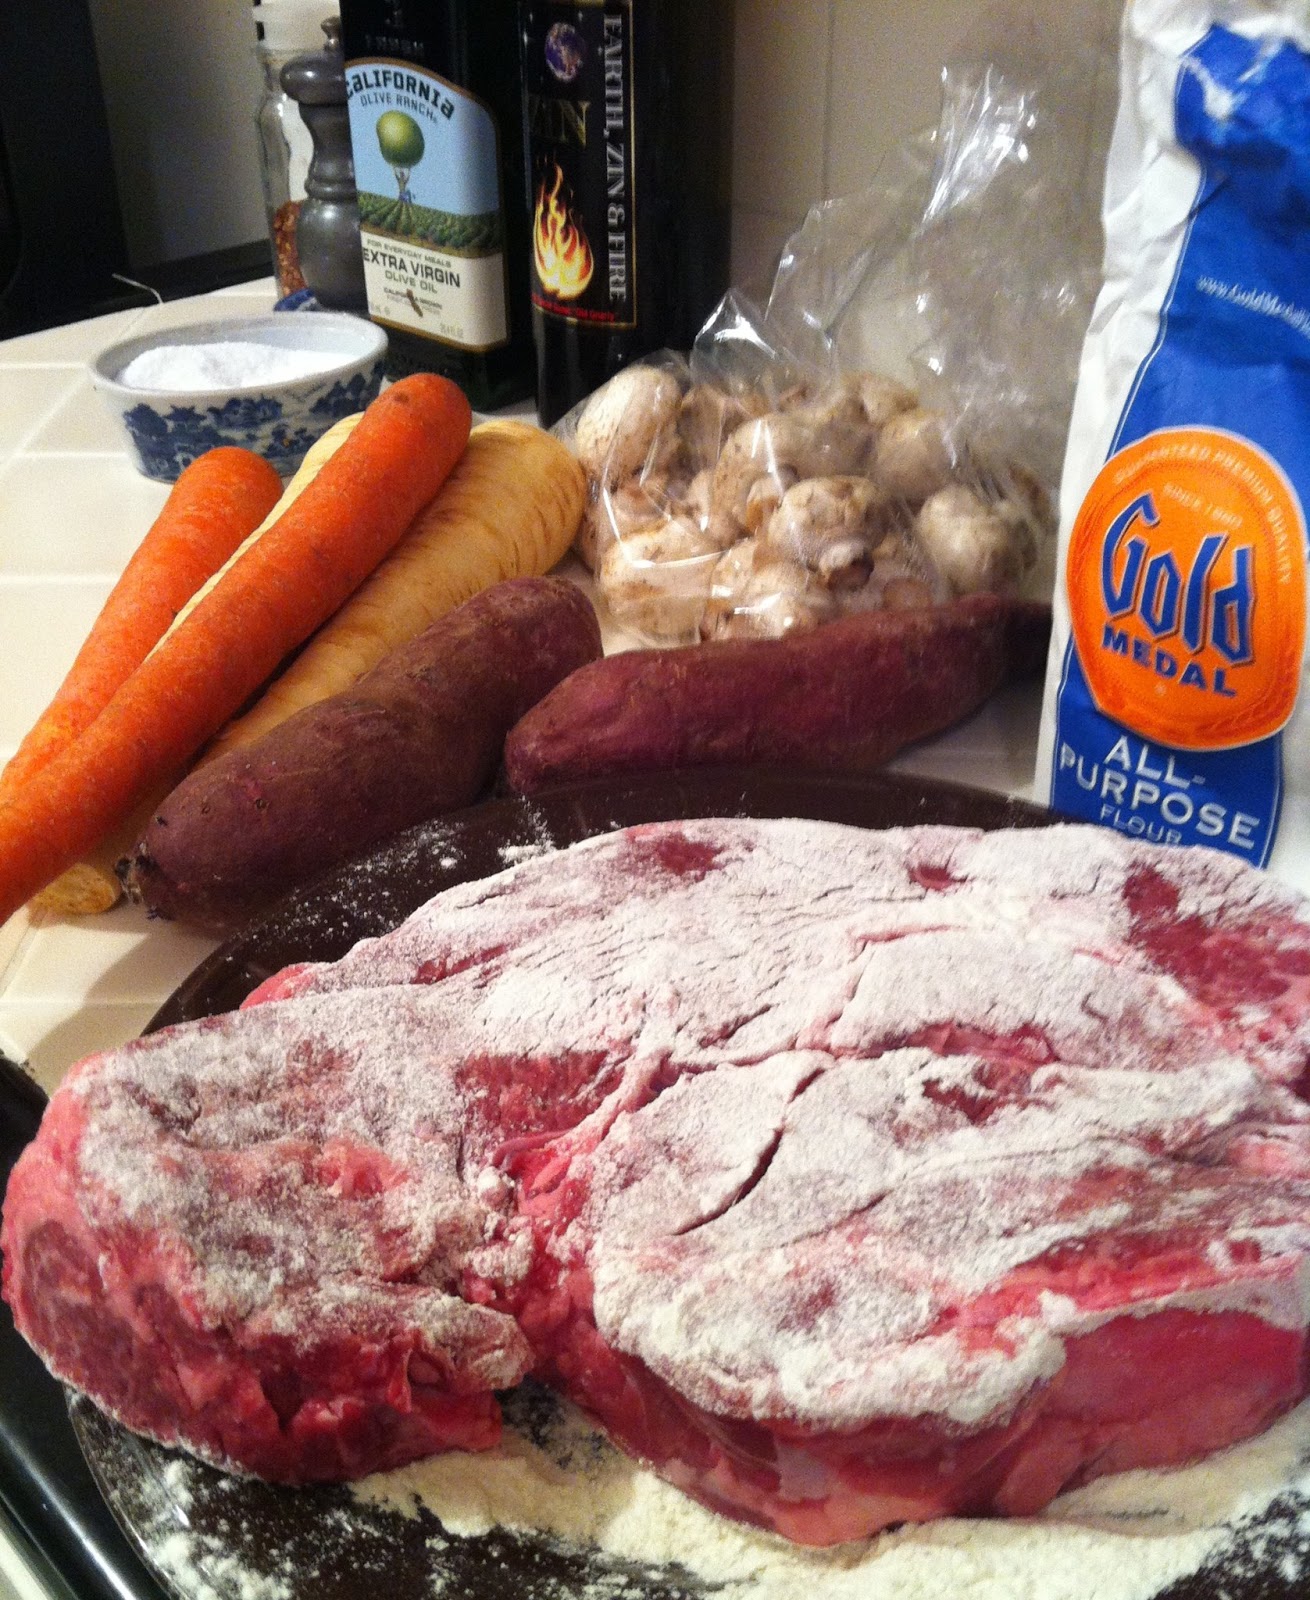
Beef Stew with Red Wine, Sharon Shiner's recipe done on the stovetop in a 5qt dutch oven

I know most people don't own a pressure cooker, or if they do they never use it, or don't know how to use it (probably the latter).  So I decided to test Sharon's recipe out on the stove top. Besides, as much as I love pressure cooking making a traditional braised stew on the stove or in the oven feels nice and "homey".  (But I do have to add that because it took a total of 2 + hours I chose not to go to my 8:00am yoga practice.  If I had done it in a PC I could have finished it with time to spare!)

I only changed it slightly.  I decided to use a whole roast instead of dicing into pieces because I wanted to be able to serve the meat in slices once it was finished.  And because I used a whole roast I also decided to do something I never do, which is to dredge the roast in flour before browning it because I wanted the end product to be a slightly thicker stew.

All of the ingredients were the same:

beef
mushrooms
onion
carrot
garlic
thyme
red wine
Pomi tomatoes (28oz)
parsnip
sweet potato

I tend to list ingredients in the order I use them which is why you see mushrooms listed after the beef.  I feel mushrooms should be browned on their own to prevent becoming, ironically, "mushy"!  So after I brown the roast and remove it from the pan I add more oil, brown the mushrooms, then simply move them to the side and, with a touch  more oil, add the onion and cook until translucent.

Add carrot, garlic, and thyme, deglaze the pot with red wine until the alcohol smell is gone. Add Romi tomatoes, oh, and I filled the empty box with water and added that before I put the browned meat back in the pot.  (salt to taste please!).  Add parsnips and bring the pot to boiling, turn down the heat to simmer and cook for about an hour.

Add in sweet potato and finish cooking for 30-60 minutes.  Sweet potatoes can get soggy so I added them in half way through the braise.

If you use stew meat that is cut up it will take about 30% less time.  Maybe 45 minutes before you add sweet potatoes, and another 30 minutes from that time (total 1 hr 15)

This was soooo delicious I decided to make another batch! I'm kinda like that, I like repitition (swings!). So when I cook a dish/meal that I've never cooked, or not cooked in a while, I'll do it a few times to get familiar with it again, and makes any changes I think will improve it for next time.

The changes I will make on Wed will be that I bought a slightly different cut of beef known as a 7-bone pot roast, only because I found one at Safeway....oh, and by the way, I chose to buy all of my ingredients at Safeway because I wouldn't want anybody to think that good food only comes from high end grocery stores.  And the other change I will make is I am going to leave the parsnips and sweet potatoes in very large chunks, at least 1 1/2 - 2 inch pieces.

One more thing....

Pomi tomatoes sold in 28oz box (around $3.99).  When I started taking cooking classes Pomi tomatoes were all the rage but I stopped using Pomi tomatoes over a decade ago after a trip to Italy.  Yes, Pomi tomatoes are a product of Italy, but most Italians use canned tomatoes, as I was shown by the host family I stayed and cooked with.  So, wanting to cook like a "real" Italian I've only used canned since.  Well, I gotta tell you, I really liked the Pomi tomatoes!  They are thicker, therefore no need to ever add tomato paste to thicken, and they are really sweet!  In fact so sweet I had to look at the ingredients to make sure there was no added sugar!  (there wasn't).  Pomi tomatoes was the only ingredient my Safeway did NOT carry fyi.

So there you have it!  No excuse not to make Sharon's Beef Stew with Red Wine!  So good I'm making it twice!  (or three times!)

PS More info on a "7-bone" beef roast:

http://homecooking.about.com/od/beef/f/7boneroast.htm


Sunday, February 24, 2013

Guest Recipe Post, Sharon Shiner's Beef Stew with Red Wine for the pressure cooker


Beef Stew with Mushrooms and Red Wine for the pressure cooker

I got my first pressure cooker in 2008; I had just started my personal chef business, Thyme To Cook, and a Fagor model was being offered for sale for a drastically reduced price by the personal chef association that I belonged to. I didn’t know how to use it and in all honestly, I had never even seen one in action. But, it felt like the right thing to do at the time, and boy, am I glad I bought it.....fast forward to today, and 4 pressure cookers later, and my trusty, old Fagor pressure cooker still gets the most action. I seriously love it. My one and only complaint is that it’s only a 6 quart pot and not bigger.

I made a delicious beef stew in it recently with mushrooms and red wine. For aromatics, I used carrots, onions, garlic and parsnips. Traditionally, I would have added in a stick of celery as well, but didn’t have any in the house, so this time around, I didn’t add it.
I also added sweet potato.

I had thyme in the house so that was my fresh herb for the stew. So a bit of a non-traditional beef stew (think no peas and potatoes), but this combo worked fine. The addition of the mushrooms allowed me to cut back a bit on the amount of beef that I used since mushrooms are meaty in their own right.  The beauty of a stew is that you can add or delete ingredients that might not appeal to you. Don’t like mushrooms? Omit them and add more stew meat. Don’t like parsnips (though I wouldn’t know why you wouldn’t enjoy them??), simply omit them. 
As for the wine, simply use a red wine that you would enjoy to drink; never cook with a wine that you wouldn’t use to drink. I used a red called Apothic Red, a bold blended red that is real luscious. If you don’t wish to use wine, simply replace it with a meat stock such as beef or chicken.

Beef Stew with Mushrooms and Red Wine
Serves 6

Ingredients
1 lb beef stew meat (chuck or round cuts work best)
1 lb sliced mushrooms (cremini or basic white)
3-4 garlic cloves, minced
2 medium sweet potatoes, large dice
2 medium carrots, medium dice
2 medium parsnips, medium dice
1 medium onion, medium dice
1.5 cups red wine or stock
1 28 oz can or box of diced tomatoes, with juice
Fresh thyme, leaves taken off 5-6 stems and chopped
Salt and Pepper to taste
Fat of choice for browning (coconut oil, olive oil etc)
Juice of half a lemon

Technique
1.  Heat pressure cooker over medium high heat. Pat beef dry, season liberally with salt and pepper. Add fat of choice to pot and add half of the beef to brown. Do not crowd the pot with the beef. It’s best to brown the meat in 2 or 3 steps. Otherwise, if the pot is crowded, the beef will steam and will not brown. Remove beef and if necessary, add a bit more fat to pot and repeat with remaining beef.


2.  Add in garlic, onions, carrots and parsnips to the pot. Season with salt and pepper and coat the veggies in remaining fat. Allow the veggies to cook for about 6 minutes until they soften up.
3.  Add in mushrooms and thyme, and again, season with a bit of salt and pepper. Let the mushrooms cook down for about 5 minutes.
4.  Add back the browned beef, the red wine, the tomatoes and sweet potatoes. Stir to combine.


5.  Add the top of pressure cooker, set it for High (or 15psi) and allow it to come up to pressure. Once pressure is achieved, turn the burner down to the lowest setting that will maintain the pressure. Cook for 35 minutes.

6.  After the 35 minutes, remove pressure cooker from heat and set it aside. The pressure is still going to remain high unless you let it out; this potentially will make the meat seize up, so it’s best to let pressure come down naturally for a minimum of 10-15 minutes.
7.  After the resting time, release any remaining pressure (always take care because steam will come out while pressure is being released), and remove lid. Check beef for tenderness. If it is not yet tender, put it back on stove and bring pressure back up for another 5 minutes. Repeat resting process and check beef again.
8.  Add the fresh squeezed juice from half an lemon, and then taste and adjust seasonings as necessary.
9.  Enjoy!


Sharon Shiner is a Certified Kettlebell Instructor and Personal Chef, you can find her on facebook here:
https://www.facebook.com/pages/Thyme-To-Cook-Personal-Chef-Service/116612145025663?ref=hl

Or check out her blog here:
http://www.thyme-to-cook.blogspot.com/

I'm lucky to have met Sharon  online through the kettlebell community, but I know eventually our paths with cross in person!  Sharon comments regularly on my facebook page with great ideas about food, recipes and like me she loves her pressure cooker!  Yay for pressure cooking!

But for those of you still afraid, intimidated or maybe you just don't own a PC and don't want to invest quite yet, I'm making this recipe right now in a traditional dutch oven on my stove top, so I will share that with you in my next blog post!

Friday, February 22, 2013

Hip Opening "Tree Pose"


I have new motivation to keep stretching and opening up my hips, but I won't bore you with the reasons for all of that now!  The real point is that I should be stretching and opening up my tight hips anyway!  All of us with tight hips, which means all of us, should be doing something on a regular basis to help open up our hip flexors and hamstrings to keep us out of flexion and more into extension....blah, blah, blah...why should you care?

Tight hips, what does that mean?  Mark says....

"It means that you have hip flexor, hamstring muscles and hip rotators muscles (the muscles underneath your butt, aka, glutes) that are not fully mobile, and what you want are muscles that do not have any restrictions.  "Tight hips" can create back pain, hip pain, leg pain not to mention a lack of mobility.  If you can't can't arch your back and/or you can't tuck your pelvis under then you probably have tight hips.  And certainly if you can't squat down to a chair your hips are really tight!  The problem comes from all of the sitting we do. We sit at the TV, we sit to eat, we sit at computers, we sit to drive....sit, sit, sit!"

The pose I demonstrate above is "Tree pose".  In Bikram's yoga practice there are a number of poses that help open up the hips.....when done properly!  I can't tell you how many times I watch people do this pose improperly.....about 100% of the time!  Even when the teacher clearly instructs to NOT have a "duck butt", guess what?  Apparently no body knows what a "duck butt" is, OR their hips are so tight they can't help it!  But if that's the case then you should take advantage of the use of your opposite hand and hold onto your foot to pull your bent leg down and back.  The "goal" is to have both legs in one line, while pushing your hips forward to open them up!  A good clue to whether or not you are doing this is to pay attention and contract your glute muscle (squeeze your butt muscle!)  In the above picture you can see I'm still a good six inches away from that!

Tree pose, in Bikram's yoga, is NOT a balancing posture.  Sure, you have to balance, but it's a hip opening posture, and your standing leg/hip/glute should be contracted...in other words, SQUEEZE your butt muscle!  If you cannot squeeze your glute then you are not in the posture.  Everybody is in a hurry to put both hands in prayer and look pretty!  In the bottom photos I demonstrate my hands in "prayer position" and then only one of my hands in prayer, while the other holds onto my foot, while pushing my bent leg down and back, and while squeezing my glute muscle and lifting up on my knee cap of my standing leg/hip.  This does two things.  Squeezing my glute helps to open my hip flexor to bring my hip forward, and lifting up on the knee cap of my standing leg ensures that my standing leg is straight.  Oh...and I also try and make myself tall (like a tree) by lifting my rib cage and shoulders, up and back, visualizing the top of my head being pulled up towards the ceiling, while on the opposite, rooting down through the floor with my entire foot (roots like a tree).
In my opinion it's much more important that you open up your hip than it is to balance with both hands in prayer, looking pretty, with a duck butt!  But that's me.  Eventually I want to get both of my legs in the same line, while having both hands in prayer, with full extension in my hips, now that would really be pretty!  Pretty and correct according to the "dialogue".  And I'm so close!

With some new motivation I'll be more focused on Tree Pose, and a few other yoga poses I will share, to help open up my tight hips!  And by opening up my tight hips get better with my GS single jerks!  Oh!!!!!  The truth comes out!  lol


Thursday, February 21, 2013

Train along with Tracy and "ladder down"! (beginners level swing routine)

Here is a simple 100 swing rep workout that takes 6 1/2 minutes complete, repeat it for a 200 rep, 13 min workout and be plenty proud to have done a really good thing for your health and fitness!

This is a routine I designed for absolute beginners that are still working towards "equal work to rest" and for those new to training the swing where 10 reps is a good solid challenge!  If you are more advanced you can still make this challenging based on the size kettlebell you use.....trust me, if I were to use a 24kg-32kg this would do the business jut fine!  Sometimes as Instructors or experienced kettlebellers we forget what it was like to be out of breath after ten reps!

As I explain in the intro video, sometimes in order to "progress" our abilities, whether it's our skill, cardio, or strength we can actually back down, decrease reps and do less, in order to do more!  At the end of each workout how many good solid swing reps did you accomplish, and in what amount of time?

This workout is done with all two hand swings and starts each work set every 30 seconds  The rep count starts at 10 reps and "ladders down" one rep per set to the last set of 5 reps. Within those six sets the work to rest goes from 1/1 to 1/3 (work to rest).


10, 9, 8, 7, 6, 5

repeat and end with one last set of 10 reps.....because you're bad ass like that!

100 swing reps, 6.5 min

Of course you can repeat this as many times and as long as you feel motivated to train!  But as I say at the end of the workout, the only way you won't improve your strength, health and fitness is if you don't do it at all!